Tuesday, December 21, 2010

Oreo Yule Log Cake


Hi All! Hope everyone is already in the mood for Christmas and Year 2011! I guess by the time you all read this post...I am already on my vacation back to California. Yeah I didn't want to post this any earlier, so I set to this date to post. :) Christmas has always been a heart warming and joyous period of the year. Families gather to share good food and gifts with their love ones, and some will even extend it further to the more needy ones too. Bless them. Christmas is all about sharing and giving. Although I haven't done anything significant, at least I made a delicious Oreo Yule Log cake to share with my family, heehee! Oh yes, before I forget! I am submitting this to Aspiring Bakers #2: Christmas! Hosted by Passionate About Baking.
Frankly speaking, it was such a last minute thing. Reason was my in-law has informed us to go over to their place for a gathering last weekend before we head off for my Xmas vacation. But being a Saturday, it's always jam packed with my kids' extra lessons, so the chances of me baking anything is slim. However I decided that I will just go ahead and bake it with the limited time I have. Believe it or not, I actually got this log cake done in 1.5hrs! Including washing up!
I guess I was really focus and wham bam it's done, hahaha! Good thing it's a sheet cake, so it bakes in no time...well in like 13 to 15 minutes. I adpated this recipe from Wendy (again) whom has a post on a Oreo Chiffon Cake a while back, which I believe she got from Cherry Potato. Either way, thanks ladies! I have reduced the recipe to fit my baking sheet pan. Here's the recipe:

Ingredients for Oreo Chiffon Cake: (for 10" by 13" sheet pan):
Set (A)
65gm oreo (half a regular tube), lightly pulverized together with cream

Set (B)
4 egg yolks
45g sugar
45ml milk
45ml corn oil
80gm cake flour, sifted

Set (C )
4 egg whites
½ tsp cream of tartar
45gm sugar

Method:
  • Mix yolks and sugar together. Then put in the oil and milk. Then the sifted flour. Combine with a whisk until smooth. (Do not whisk or beat but just combine)
  • Preheat oven at 170C.
  • Beat egg whites until frothy, put in cream of tartar and beat until soft peaks. Put in sugar gradually and beat until stiff.
  • Gently fold in the egg whites into egg yolk mixture 1/3 at a time till all is incorporated.
  • Put in pulverized oreos and fold until well combined.
  • Pour batter into greased and parchment lined baking sheet pan and level it evenly.
  • Bake in the preheated oven for 13 to 15 minutes till tester is clean and the top is golden brown.
  • Remove from oven and let cool completely before removing from pan.
Filling:
100g Valrohna chocolate (65% cocoa), chopped
200ml non dairy whipped cream, whipped.

  • Melt the chocolate under double boiler and let cool slightly but still warm to the touch.
  • Add the warm chocolate to the whipped cream and stir well till everything is well blended and even colored.
  • Chill in fridge till needed.
Topping / Coating:
1 pack of 125g original Oreo cookies, pulverized (I used only 3/4 of it)

Assemble:
  • On the cooled sheet cake, spread 1/2 of the chocolate cream evenly over, leaving about 1 inches "uncreamed " on one longer-sided end.
  • Roll up the sheet cake on one of the long side and press firmly and wrap up with a clean kitchen towel. Chill the cake for 30 minutes. (I didn't...no time!)
  • Once chilled, slice about 1/4 slightly at an angle from one end of the cake and place the 1/4 section where desired to create a side branch.
  • Cream the log cake with the remaining 1/2 portion of chocolate cream.
  • Pat the pulverized Oreo cream all over the log cake. Decorate as desired.
This is a delicious cake, trust me. The whole family enjoyed it and many of them went for seconds, heehee! Come on...Oreo and Valrohna chocolate...what's not to love, lol!
Across section shot...I have to agree with my niece whom commented that this was the perfect swiss roll size, not too big a roll and just right for desert. Yum! :P
Lastly, I want to take this opportunity to wish all my dear readers, fellow bloggers and everyone out there;
A Blissful & Joyous Christmas!

See everyone in the new year, 2011 that is. Take care and cheerio all!

Thursday, December 16, 2010

"Thousand Layer" Butter Bread Loaf (奶油千層吐司))

Believe it or not, it's less then 10 days to Christmas (and 15 days to year 2011)! Amazed how time flies...when you do a reality check sometimes. I remembered last year this time, I was packing my bags and leaving KL and my dear friends behind. *sob* It was a tough time for me but look where we are now after a year, all settled down and got back the rhythm of life again. It isn't easy, but I am glad how things are now. I am happy and contented, well at least when I don't think too much, I am, hahaha! For what is worth, I learn to be more independent and grew a little stronger then before. I am still thankful every single day for what I have and always looking forward to a better tomorrow. More importantly (at least with respect to this blog), I can churn up more delicious food for all to share. :)

Oops, sorry about my little "speech"...I can get a little carried away sometimes, lol! You must be wondering when am I gonna get to the food part! Hahaha! No worries, here it is, today's menu is "Thousand layer" Butter Bread loaf (奶油千層吐司). Okay, might be a little exaggerating to say it has a thousand layers, but I was merely doing a direct translation. :)) I wonder if I even got 10 layers in there, hahaha!
I got this wonderful recipe from Carol 自在生活. I could totally imagine how buttery good the loaf was gonna be before I even made it. :P Anything is better with butter. :) By the way, this recipe is vegetarian! No eggs! Well, that is if you skip the egg wash at the end. :)
I did some slight modification to the recipe, here it is:

Ingredients for "Thousand Layer" Butter Bread Loaf (奶油千層吐司):

270g bread flour
30g cake flour
40g caster sugar
225ml fresh milk
1/3 tsp salt
1/2 tsp instant active yeast
20g unsalted butter

For layer:
30g of salted quality butter ( I used President Butter)

Egg wash for glazing (omit if vegetarian version)

Method: (Please refer to original recipe for step by step instructions)

  • Mix all dough ingredients except for butter together in a large mixing bowl to form a soft dough. Place on work area to knead or mixer to do the kneading. Knead the dough till it is not sticky, about 20 minutes.
  • Add the unsalted butter in and continue to knead till the dough is shiny and elastic. To test if the dough is ready, pull a small piece off and stretching it with your fingers. If dough is very elastic and pulls to almost see through without breaking, then it's done.
  • Place dough in a greased bowl and cover with plastic wrap and allow to proof for at least 90 minutes to 2hrs.
  • Once it's doubled, punched out the air and divide the dough to 65g portions, roll round and cover to let rest for 10 minutes before shaping.
  • Roll the dough out into a large rectangular about 30cm by 50cm. Spread the reserved salted butter on it leaving about 1 inch on the sides.
  • Roll up the dough from the short side and seal all the four edges tightly.
  • Fold the log into half, with one half on top over the other. Then use a sharp knife, slice down leaving about 1" at the end.
  • Braid the dough and gently place it into a greased loaf tin. Let it proof till 80% full.
  • Bake in a preheated oven of 175C for 30 minutes till top is golden brown.
  • Remove from loaf tin immediately and let cool on rack before slicing to serve.
Once this butter loaf was out from the oven...the buttery fragrance filled the whole house! Heavenly! I was very tempted to take a bite out of it, lol! Good things come to those who wait...:D It is so soft, I can't imagine if I did slice it before it cooled down...probably moshed, hahaha!
Okay, you can see for yourself the fluffiness of this bread. I teared a piece off and was delighted! It's truly buttery good. Well from the photo, you can't really tell the buttery scent and taste, but trust me...it's like a croissant loaf. :) Do try it...but bare in mind to use quality butter for this recipe, it's worth it. :))

Anyway, got to go do some packing now. Yup it's finally my turn to hit the roads and have some time off. Will be back real soon folks....you all have a great weekend now! Cheers!


Monday, December 13, 2010

A "Grace-full" week : No bake Strawberry & Mango Cheesecake

This week has been a quite an eventful one for me. Why? Well, I had the pleasure of having two nice ladies coming to visit me this week. And it so happened that these two ladies shared the same name...Grace. :) And thus the post title, "Grace-full", heehee. :D One of these ladies I believe most of you bloggers will already have come to know, she is Grace from Kitchen Corner. I came to know her through blogging more then 2 years ago. We then got to meet up twice during the past bloggers' gathering and found out we actually stayed pretty close to each other! After going to and fro a couple times, we finally got to meet up to have lunch at my place. It was a really pleasant meet up as we just chat away non stop and enjoyed our lunch happily. ;) Grace was nice enough to bake me some yummy cakes even while she's been really busy lately. Thanks my friend! I too managed to make a simple cheesecake for her, which is No Bake Strawberry Cheesecake which we delightfully enjoyed after our Sweet Italian Sausage pasta.
This is one of my all time favorite cheesecake. It's light, not the same as those baked version cheesecake which is much more dense and filling. The addition of whipped non dairy cream to the recipe makes it lighter but still creamy and delicious like a soft serve ice cream, yum yum!

I didn't add any Strawberry chunks into the batter because I wanted it to be nice and smooth...kind of like melt in your mouth texture. :) And besides using strawberry, I believe you can use all sorts of yummy flavor! Passion fruit, chocolate, lemon and even Dulce De Leche!

This recipe turned out just right, with evident strawberry flavor (no essence added, all natural!) and with the right amount of sweetness. Luckily Grace whom is such a great baker also said it's nice. *phew* I loved it so much that I actually craved for it the following day, lol!

Ingredients for No Bake Strawberry/Mango Cheesecake: (makes one 8" round)
Cookie Base:
200g graham cracker, crushed
100g melted butter

Cheese filling:
400g cream cheese, soften
90-100g caster sugar (adjust sweetness to your own liking)
1 cup fresh strawberry/mango puree
200ml non-dairy whipping cream, whipped
1 tbsp fresh lemon juice
1 to 1.5 tbsp gelatin powder and 4 tbsp water


Jelly Top:
100g fresh strawberry/mango puree
100ml water
2 tbsp caster sugar
1 tsp gelatin powder
1 tsp agar agar powder
Method:

  • For cookie base: Mix all ingredients together. Then press the mixture evenly to the base of a 8" or 9" cake pan (preferably those with removable sides or base) Chill the cookie base for at least 30 minutes before using.
  • Cream the cream cheese, sugar, lemon juice and strawberry puree till smooth. Gently stir in the whipped cream and mix till well incorporated.
  • Using double boiler, melt the gelatin in the 4 tbsp water. Let cool slightly but not much else the gelatin will solidify again. Scoop 2 tbsp of the cheesecake batter into this gelatin mixture till well combined. Then add this mixture to the cream cheese mixture and stir well.
  • Scoop the cream cheese batter over the cookie base and level it smoothly. Chill it in the fridge for at least an hour before use.
  • Meanwhile, make the jelly top: In a small saucepan, add all the ingredients in and gentle boil till gelatin and agar agar powder melt and blends in the mixture. When the side of the mixture starts to bubble, remove from fire and let cool for 15 minutes. Then pour the mixture over the cream cheese top and chill it for at least 30 minutes.
The other friend called Grace is an old friend cum neighbor which I had the pleasure to come to know for 3 years while I was staying in KL. She's been a supportive and always welcoming friend to me. I was glad that she is coming to Singapore this time because it's been 3 years since her last visit. Coincidentally, her birthday happens to fall close to the date of her visit to Singapore. That would means I can bake her a birthday cake to celebrate this special day together with her.
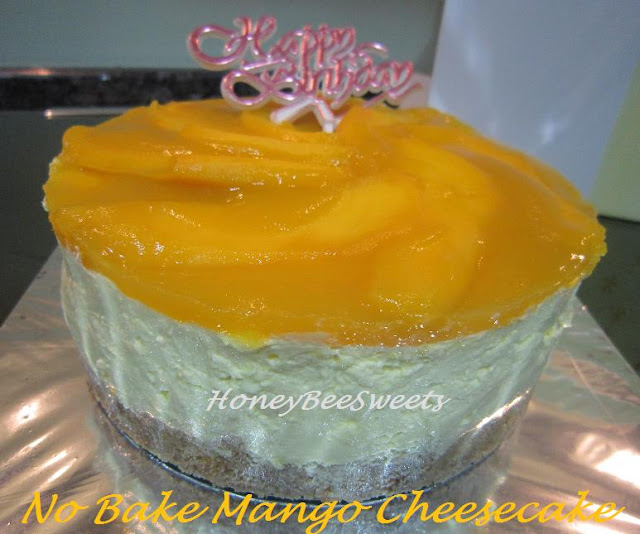
This is not the first time I made a birthday cake for my friend Grace. Last year I did a simple birthday cake for her, which is butter cake with blueberry filling and butter cream. This year I wanted to make her something different, on the lighter flare, similar to above, but a No Bake Mango Cheesecake, heehee. :D Only managed to snap the above photo since I was rushing off to meet her for dinner that evening. But rest assured that she and her family loved the cake as well. :)

I will definitely try out this recipe again. Perhaps with a much more exotic flavor or maybe just my all time fave, dark chocolate. :)) Let me know if you ever try this out. Signing off now, take care all and have fun baking!

Wednesday, December 8, 2010

Birthday Cake for my Dad

My dad's birthday happens to be the last of the family birthday celebration every year. Being born in the month of December, the head of the family gets to have his birthday celebrated last in line. :) The usual practice would be dining out with the whole family at his choice of restaurant and follow by a birthday cake. Just like my mom's birthday, this year will be my first time making him a birthday cake. I have been pondering for weeks what kind of cake should I bake for him. To play on the safe side, I opted for a fruit cake since you can't be too adventurous for an elderly's cake....else all that "too sweet" comment will be coming on. I got inspired when I saw Ann's Mango Mirror Cake the other day. So I went with the idea and baked this:
I do apologize for the poor lighting for the photos. I was rushing to finish this and just simply took a few shots without thinking much. :P *silly me* Despite all that rushing, I still find the result satisfactory, especially since it's my first attempt, heehee. :D
As you can see, the looks of this cake is pretty much different from Ann's Mango Mirror Cake. I guess it's modified to become my own creation and some inspiration from her cake of course. :) Regardless, thanks Ann! The main difference was the sponge cake layer recipe. Since at that point when I made this cake, I didn't have any optima flour at hand. So I had to change it to making Mango yogurt chiffon cake recipe instead, something I am familiar with. Luckily it turned out fine. :P
The cake turned out really delicious and satisfying, definitely a keeper. It was great that everyone was still able to down a slice after that 10 course dinner. :))
A shot of a slice of the cake...looks all creamy & luscious but not as neat looking as Ann's version, lol! Furthermore, my cake layer seems almost "invisible" since it has the same color as the cream layer...haiz! Anyway, it is still delicious and my dad loved it. :) Mission accomplished. Interested bakers, please head over to Anncoo's blog for details. Happy baking!


Sunday, December 5, 2010

Sweet Potato Fatt Goh with Japanese Black Beans

This is really a long overdue post. I believe I made this close to a month back. But it is not surprising since last month was again a busy month for me. Actually, this is an all original HoneyBeeSweets recipe, something that was created out of inspiration from the local eateries here in Singapore; Sweet Potato Fatt Goh with Japanese Black Beans. Well I happened to be at Bugis Junction the other day and was walking around it's food court area. There was this store that was selling fatt goh, pretty special ones mind you, but I can't remember the name of the store. :P Anyway, I got really inspired after seeing these pretty steamed cakes and vowed to try making something similar at home. So here it is:
Frankly speaking, I cannot remember the variety of flavors that was selling at the store there. So I just came up with my own version, and it turned out great! ;)) Any interested bakers out there can try this recipe, but since this is my first time making this, I can't guarantee that you will have similar results, heehee. But should be alright. :))

Ingredients for Sweet Potato Fatt Goh with Japanese Black Beans: (makes 12 muffin size)
200g steamed sweet potato (preferably Japanese)

400g plain flour
225g caster sugar
3 tsp baking powder

1 tsp salt

225ml evaporated milk
2 large eggs

60ml vegetable oil

1 can Japanese black beans (you can substitute with Azuki red beans)


Method:
  • While the steamed sweet potato are still warm, cut into large chunks and place in the blender along with the caster sugar, eggs, corn oil and evaporated milk. Blend at medium speed till smooth.
  • Prepare the steamer at medium high heat.
  • In a mixing bowl, add flour, baking powder and salt. Pour the blended mixture into the flour mixture and mix well.
  • Scoop the batter into paper lined steamer cups to 3/4 full. Place about 4 to 5 black beans on top and transfer the cups into the steamer .
  • Steam for a good 10 to 12 minutes till the tester comes out clean. Remove from steamer and let cool on the rack before serving.

The texture of the Sweet Potato Fatt Goh is fluffy and light..much to my preference. The black beans gives a slight salty, sweet flavor to the cakes, a pretty nice combo. In case you are wondering, I got the Japanese black beans from Daiso...it comes in a small purple can. ;)
If you do try this out, let me know how it turns out for you. ;) Also note that you can replace the evaporated milk with full cream milk, the taste should not differ much. Anyway, hope you all will like this recipe. ;)) This is definitely a healthier breakfast compared to your usual stored bought fried food don't you agree? :)
Before I finish off this post, I want to share a nice news. I got a pleasant surprise when I was doing my usual blog visiting yesterday. I got 2 new awards! All thanks to dear Kristy from My Little Space for passing these lovely awards to me. ;) Very nice of Kristy to think of me. She's is such a versatile and dynamic cook with loads of yummy recipes. So do go visit her blog when you get the chance. Guarantee there won't be a dull moment browsing through her recipes. :)
Besides being honored in receiving these awards, I am also much motivated to be a better food blogger for my dear readers. Thank you all for the support! Will try my best to post more delicious and unique recipes for all to share.

Have a great week ahead all!


Tuesday, November 30, 2010

Homemade Soy Milk & Vegetarian Soy Milk Whole wheat Bread

I have always wanted to make soy milk at home. Call me silly, but I always thought that it requires a soy milk machine or something to blend the milk out. Well, I was so wrong, lol! Great thing Wendy posted the recipe for making soy milk and the 'mystery' was gone, yippee!! It didn't take me long to buy a pack of soy beans and got to make fresh soy milk...at home! :) You must be thinking why bother with so much trouble if soy milk is so darn cheap outside. Well, it's hard to explain, but being able to make it yourself is fun! And furthermore, I know I am able to churn out more stuff with the soy milk later too. :)) Exciting!
And after making the soy milk myself then I realize that it's so darn easy to make it!After tasting my homemade soy milk, I am hooked! Think I will never buy another box of soy milk at the grocer ever again, lol! Up from the point I knew how to make it, I've already done it thrice! Which is all within this month, lol! As tempted as I already am, I still did not make the tofu with the soy milk. Why...somehow I always have some store bought tofu / egg tofu in the fridge (I always have tofu in stock since my family love tofu) I guess that should be all the more reason I should make tofu at home. Well, perhaps next month another post yah?

Recipe adapted from Wendy's blog
Ingredients for Soy Milk:
150g soy beans
750ml water + 750ml water
2 to 3 knotted pandan leaves

Method:
  • Soak the soy beans overnight or at least 8hrs. Throw away the soaking water. Use your fingers to loosen the skin of the beans. Then using a sieve to scoop it out. If it doesn't bother you, you can skip the step of removing the skin. But it is known that the skin of the beans can cause joint pains.
  • Put all the beans into a blender with 750ml water at high speed. Blend until very fine, for about 2 minutes.
  • Pour the blended beans puree into a fine sieve bag and press to extract the soy milk into a pot.
  • Place the soy mixture into the blender again and repeat the blending process with another 750ml water, then extract milk to the pot.
  • Add a couple of knotted pandan leaves into the pot and start boiling the soy milk. Keep a watchful eye over it as it over boils and flows out very rapidly. Serve warm or chilled.
I made quite a bit so I divide half of the soy milk to add different sweetening syrup. One was with plain white sugar and the other was with gula melaka. However I didn't like the gula melaka version since the taste was a bit off and over powering.
But after chilling it for a few hours in the fridge, it was still acceptable. Although I still recommend using plain white sugar if you like the traditional soy milk taste. I like mine chilled and having it with something savory like carrot cake or simply just bread (soy milk bread) is a breakfast bonus. Yum!!:)
Talking about bread, I bet those that follow my blog would not be surprise that I will make soy milk bread, lol! Being a soy milk fan, it does make sense to try out making bread from it. :)) Furthermore, I did see some bloggers out there already attempted that...so it should be pretty good. ;) Let me correct it...it's not good, it's great!
Ingredients for Vegetarian Tang Zhong “湯種" Soy Milk Bread:
Starter dough (“湯種"):
250ml fresh soy milk (you can use store bought sugar free ones)
50g cake flour

Main dough:
200g of starter dough
420g bread flour
80g wholemeal flour
1 tsp salt
1/2 tsp instant active yeast
45g caster sugar
240ml fresh soy milk (you can use store bought sugar free ones)
40g vegetable oil
30g butter @room temperature

Method:

  • Mix all dough ingredients except for butter together in a large mixing bowl to form a soft dough. Place on work area to knead or mixer to do the kneading. Knead the dough till it is not sticky, about 20 minutes.
  • Add the unsalted butter in and continue to knead till the dough is shiny and elastic. To test if the dough is ready, pull a small piece off and stretching it with your fingers. If dough is very elastic and pulls to almost see through without breaking, then it's done.
  • Place dough in a greased bowl and cover with plastic wrap and allow to proof for at least 90 minutes to 2hrs.
  • Once it's doubled, punched out the air and divide the dough to 65g portions, roll round and cover to let rest for 10 minutes before shaping.
  • Fill the dough with any desired filling. Let proof for another 20 mins, brush with egg wash. Bake @ 175C in a preheated oven for 15 to 18minus till golden brown.
The first time I made these soy milk bread, for fillings I used black sesame paste, chocolate paste and cream cheese with dried cranberries. Some left over dough were used to make mini hot dog buns. The second time I made soy milk buns, I used red bean paste and also a small raisin loaf, upon request by my girls. :)
There is a nice evident smell of soy milk in the buns and loaf which I really like. ;) I like eating the raisin loaf the best as it can be enjoyed without any spread, but with nice sweet compliments from the raisins and still able to taste the soy milk in it. :) However, if you are not a fan of soy milk, feel free to substitute it with plain milk, it'll taste real good too. :)

A picture to show the softness of the soy milk buns. :)) What best is it's vegetarian and it's wholewheat too! Hope this post can get you really motivated to make some soy milk and breads at home. :) It's really worth every ounce of effort. :) I know for sure that I will be making more of these, perhaps trying out black beans next time, that would be really interesting! So stay tune folks!

Have a good week ahead all! Cheerios!