Monday, February 28, 2011

Chocolate Swiss Roll (New Method)

Hi all, hope everyone had a nice, relaxing weekend. :) Anyway, over the weekend, I managed to meet up some of my Junior College friends. Boy was it good to see them again. :) Although we rarely meet up, probably once or twice a year. But every time we see each other, it feels like we just met a couple weeks back. We don't blame each other for not being able to meet up more often or making that extra phone call. Its just a magical mutual understanding between us friends that we know we are all leading a busy life and know how it is. Even though we haven't spoken for months, there was never any awkward moments when we talk. Its just so natural and nice feeling. Guess good friends never fails huh? Anyway, to give my old friends a small treat, I decided to make a Chocolate Swiss Roll Cake for everyone to enjoy.
I know, not another chocolate Swiss roll! As mentioned in my previous post, I wanted to show everyone this new method of making a sponge cake which was taught in the 孟老师的美味蛋糕卷 cookbook. This method is also called the "分蛋式海绵蛋". I wouldn't have think much about it until Grace from Kitchen Corner mentioned to me that this method yields the softest and best sponge cake. I trust her of course and tried it. True enough, it is soft and it doesn't deflate so much like the chiffon method. Now I am only wondering would Rose's sponge cake method be any better then this? I guess I just have to try both recipes a couple more times to REALLY finalize on the "superior" one! But trust me, both recipes are good. :)

Recipe for Chocolate Swiss Roll (modified to suit my tray size)
Set A:
37g unsalted butter
120g egg yolk (about 7)
37g caster sugar
30g unsweetened cocoa powder
30ml ice water

Set B:
180g egg white
90g caster sugar

34g Cake flour
34g plain flour

Filling:
120ml fresh whipping cream, whipped
80g semisweet chocolate, melted (must be slight warm when used)
~6 to 8 fresh strawberries

Method:
  • Melt the butter from Set A under double boiler and let cool until needed.
  • Line a baking tray with parchment paper and greased it again. Preheat oven to 170C.
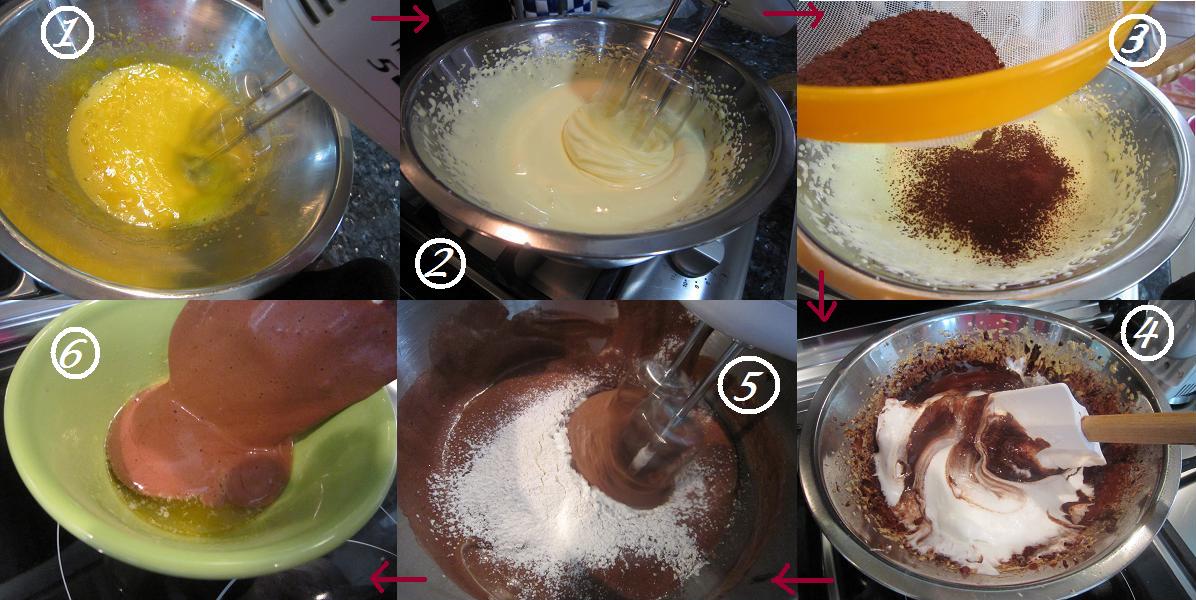
  • Picture 1: Again under double boiler, beat the egg yolks and sugar (from Set A) till triple in volume and thickens as shown in Picture 2.
  • Picture 3: Sift the cocoa powder into the thicken egg yolk mixture and mix gently, making sure it is not deflated. Then add in the ice water and stir in gently till combined.
  • At the meantime, beat the egg white with gradual addition of the sugar in Set B and beat till mixture is stiff peaks.
  • Picture 4: In 3 separate portions, add the egg whites into the yolk mixture, folding gently till all is added in.
  • Picture 5: Sift in the flours in 3 separate portions as well, using the electric mixer at its lowest speed. Do this till there is no visible lumps of flour and making sure not over beating and deflating the mixture.
  • Take about 2 tbsp worth of the batter and mix into the melted, cooled butter. Make sure it is well mixed and then add it back to the cake batter and gently stir to blend.
  • Picture 7: Finally, pour the batter into the baking tray and level out with a scraper.
  • Picture 8: Then bake in the oven for 12 minutes or till tester comes out clean.
  • Add the warm chocolate to the whipped cream id desired to make chocolate cream and spread the filling evenly on the cake once it is completely cooled. Place the fresh strawberries at one end of the cake and roll it up from the end where the strawberries are and chill it for at least 30 minutes before slicing.
Hope my photos and steps will give you folks a better idea of this method. If it's not clear enough....feel free to drop me a comment if you have queries. :)
As you can see, my Swiss roll was a bit of a rough work. :P I was again rushing to finish it off in that 2 hours time frame (plus all that photo taking. :P) But coating the roll with chocolate rice was a great idea...some how it gives me a nostalgic feeling every time I have chocolate rice, lol! It reminds me of all those cakes from those traditional bakeries we used to eat during childhood. :)) So sharing this classic cake with my old friends was just perfect don't you think?
The sponge cake was soft with a nice "spring" to its texture. And furthermore, it rolls up very nicely with no cracks. So if you have problems with using chiffon method, why don't you give this method a try? You'll be pleasantly surprised. :)

Okay all, gotta run. Hope you have a good week ahead. Cheerio!!

Monday, February 21, 2011

Chocolate Chocolate Chip Bread Loaf

I love all things chocolate, no doubt about that. :) So if you adore chocolate like me, you have come to the right stop today. :) I have a chocolaty bread recipe to share with you folks, sure to satisfy any chocolate craving you have. Its been awhile since I last baked bread for the family, and what's better then to start it off with a Chocolate Chocolate Chip Loaf, yum! :)
I adapted this recipe from the latest bread recipe book I purchased, "Natural Breads Made Easy" (Chinese is "天然麵面包"). There is a Coffee Bread recipe which I modified it to Chocolate version instead. :) This is one of those that requires pre-fermented dough and leaving it to chill in the fridge up to 17 hours. Please refer to my previous Milk Tea Bread Loaf. :) Curious how good this Chocolate loaf is? Well, here is the modified recipe, try it out if you "dare", hahaha!

Ingredients for Chocolate Chocolate Chip Bread:
Pre-ferment Dough:
469g bread flour
268g water
13g fresh yeast (I used instant active yeast)
7g sea salt (I used table salt)
13g skim milk powder

Dissolve the yeast in water. Add bread flour, sea salt, skim milk powder and knead until soft. Cover the dough in cling wrap or a big zip log bag. Refrigerate to let it prove for 17 hours.

Note: The dough will expand in the fridge. So whatever container you put the dough in, do give some allowance for growth.

Main Dough:
201g bread flour
20g unsweetened cocoa powder
7g sea salt (I used table salt)
70g sugar
80g beaten egg
60ml fresh milk
60g quality milk chocolate melted and cooled
7g fresh yeast (I used instant active yeast)
66g unsalted butter, room temperature

Method:
  • Knead all ingredients of the main dough together, except the butter. Add pre-ferment dough piece by piece. Knead after each addition until soft and smooth. Add butter. Knead until stretchable consistency.
  • Put the dough into a big bowl. Cover with cling wrap and let it prove for 30minutes till double.
  • Divide the dough into 6 equal portions. Flatten each portion with your hands to drive the air out. Roll it into square shape, cover and let rest for 20 minutes before shaping.
  • Flatten the dough to drive the air out. Roll each out into a rectangular sheet with a rolling pin. Fold about 2cm from both sides towards the center and roll it out again. Roll the dough up like swiss roll (the width should be the same as the tin) and out them into the mould. Repeat for the rest of the dough portions. Cover with cling wrap.
  • Let it prove for about 45 minutes or until the dough has risen to 80 to 90% of the depth of the loaf tin. You can either cover the lid or bake it open top like mine. If open top, brush with egg wash. Bake in 175C for 30 to 35minutes.
I have actually separate the dough recipe into 2 loaves to bake on separate days. The first loaf was done the very next day after the pre-fermented dough was chilled for 17 hours. While the other portion was used 4 days later...still good! So no worries if you got a little busy and can't make the bread the very next day, the dough will still bake out nicely. :) Cool huh!
The loaf turned out great, easy to knead and also rises pretty fast too. The only mistake I made was to add chocolate chips. :P Why? Because when I slice the loaf, the chocolate get all gooey and stuck onto the knife...not clean cut if you know what I mean.
Once again this method has yield a really soft, tasty and slightly "bouncy" (the Chinese would describe it as Q-Q, heehee) loaf. If you have tasted this, its really hard to go back to those off the shelf store-bought loaves. :P And when it was fresh out of the oven, my little one was really eager to taste it and kept on hurrying me to finish the photo shots, lol! She gobbled up one and half slice!s Yes, she's a choco-lover like me. :D

Okay, hope you folks will try this out and have fun baking it! Have a great week ahead!

Wednesday, February 16, 2011

Birthday Cakes

It has been quite a busy week for me right after CNY. I got 2 birthday cake orders to fill so I was literally stuck home making birthday cakes and doing house chores the whole time. ;P Frankly speaking, I like it! (not the chores part of course!) I feel honored to take this all important job for making someone's birthday just a little more special. :) The first order came from a neighbor whom has requested me to make birthday cupcakes for her daughter. After some discussion, it was decided on garden theme. So here it is:
If you ask me, this is 60% fun, 40% hardwork. :) I love playing with fondant, so when my neighbor asked for it, I jump to the opportunity! Lol! Even though it does take up time for the moulding, but with proper time planning, everything will fall into place nicely. :) Furthermore, cupcakes are much easier to handle rather then a whole cake. :P
Comparing this with my previous fondant cupcakes for my kid's birthday, this is definitely a much easier one. :) I made the usual chocolate butter cake, piped buttercream tinted with leaf green over it and top off with the fondant "insects", wordings and flowers. :)
I do hope the birthday girl and her friends love these cupcakes. :) Happy Birthday Jade!

The other order I got was from my husband's office. I guess the primary reason why this order came about was from my Root Beer Chocolate Chunk Cake. Apparently the birthday gal loves to drink Coke and so her thoughtful husband took the initiative to order a Coke Chocolate Birthday cake to celebrate her birthday. :)
As I did mention in my previous post, the root beer taste was not evident so I suspected it was gonna to be the same even if I switch it to Coke. Furthermore I had to change the recipe to sponge cake rather then pound cake but still using Coke as the base fluid ingredient. Reason is simple...who uses pound cake for birthday cakes?!
I have adapted the technique "分蛋式海绵蛋糕" from my new cookbook collection; 孟老师的美味蛋糕卷. It is a little different from your usual chiffon method, but supposedly more soft and yet stays fluff without deflating. However since I needed to incorporate Coke into the cake, it got a little more tricky even though I have tried that technique before. Well, a baker's gotta do what a baker's gotta do...just bake!
It's good that the chocolate cake still turned out decant. *phew* However, even though as much Coke as I've added to the recipe, the Cola taste wasn't that evident. :P I even soaked a couple tablespoons of Coke onto each layer of the sponge cake! Oh well, I did what I could, I just hope the birthday girl wasn't too disappointed about it. :P Anyway, hope you have a great birthday celebration! :)

I won't be sharing this recipe since I did modified the original recipe from
孟老师的美味蛋糕卷. I will post up another Swiss roll recipe with this technique soon, so stay tune if you're interested. :)

Okay, thanks for staying on to read my post. But I gotta go now. :P Hope you all have a great remaining week! Cheers~!


Monday, February 14, 2011

Mini Genoise Cakes with Dark Chocolate Ganache

No, there's no triple layer chocolate cake with luscious cream filling nor there's any heart-shaped creamy cheesecake with elaborate decorations. I guess it has something to do with the over eating during Chinese New Year that had tone down the baking mood. But I didn't want to let this special day pass by without making a little something special for my 3 Valentines at home. :P So I decided to do something not too elaborate but yet presentable as a nice desert to serve. I went with one of the simpler recipes in Rose's heavenly cakes cook book, i.e. Chocolate Bull's-Eye Cakes. And since I have this silicon heart shaped cake mould, I made this:


If you have that book, you probably think the cake look kinda different, I don't blame you, it is! Besides the different cake mould used, I did skip a few steps in Rose's recipe as I think it's not necessary for my taste buds. :)) Her recipe actually soaked the genoise with syrup (sugar and water mixture) and then brushed the mini cakes with apricot glaze. I think you can imagine as I was worried it'll be too sweet...:P Also, I made simple chocolate ganache verses Rose's Chocolate cream filling which involves adding egg yolk to it.

Fortunately, the cakes still turned out heavenly! I vowed that I will use this sponge cake recipe from now on. :)) It's tender soft and yet doesn't deflate much after it's out from the oven. :) Anyway, without further ado, here is the recipe:

Genoise Cake Batter:
43g clarified butter (I used unsalted butter)
3/4 tsp pure vanilla extract
2 large eggs + 1 egg yolk (100g + 18g)
66g suferfine sugar
66g Wondra flour( I used 33g cake flour + 33g corn flour)

Method:

  • Preheat the oven to 175C.
  • To prepare the butter, in a microwavable bowl, warm the butter until hot. Stir in the vanilla extract, cover and keep warm.
  • To prepare the egg mixture; in the bowl of a stand mixer set over a pan of simmering water, heat the eggs, yolk, and sugar until just lukewarm to the touch, stirring constantly with a long handled whisk to prevent curdling.
  • Immediately remove the bowl to the stand mixer and attach the whick beater. Beat on high speed for a minimum of 5 minutes. It will more than quadruple in volume and very thick and airy.
  • Remove almost 1/2 cup of the beaten egg mixture and whisk it thoroughly into the melted butter.
  • Sift about half of the flour over the remaining egg mixture, fold it in gently but rapidly until almost all the flour has disappeared. Repeat with the remaining flour until all traces of the flour have disappeared.
  • Fold in the butter mixture until just incorporated. Make sure you reach into the bottom of the pan to be sure to moisten all the flour.
  • Pour the batter into the prepared cake pans. Bake for about 15 to 20 minutes (mine took 15 minutes), or until golden brown anf the cakes start to shrink slightly from the sides of the pan mould.
  • Note: To prevent the collapse of its delicate foam structure, while still hot, the genoise must be unmould as soon as it is baked. (this is new to me!)
Chocolate Ganache:
50ml heavy cream + 75g semi sweet chocolate, chopped (I used 65% cocoa Valrohnoa)

  • Heat the heavy cream in a saucepan till almost bubbling. Remove from fire and add in the chopped chocolate and let stand covered and unstirred for a good 10 minutes. After 10minutes, stir the mixture well till combined nicely. Use when needed.
  • I scooped about 1/2 tsp amount to the cavity of the cake top. You can chill the cake to let the chocolate ganache harden a little, but I like mine room temperature.

See the fine bubbles in the sponge cake? I like this recipe as it doesn't involve using too many ingredients...e.g glucose. Try it for yourself and you'll see. :)

These mini cakes are such a delight to snack on. :) I think I will double the recipe next time to make more to share. :D My 3 Valentines loved them and said its the best Valentine's day gift, hahaha!

I am also submitting this to Aspiring Bakers #4: Love In The Air (Feb 2011) hosted by Cuisine Paradise.

Lastly, before I sign off, I would like to wish all a Sweet Valentine's Day! Cheers!


Monday, February 7, 2011

Hazelnut Chocolate Chunk Banana Cake

Hello everyone! I trust that one and all had a joyous and fun filled time during this CNY holiday. :) With so much good food around, I can totally understand that its hard to stop munching on them, lol! I know because I have already lost sight of my waistline!! Anyway, besides busy baking away before the holidays, I was doing the usual NY visiting and having friends over, so time really just went by unconsciously. Although school and work has already started for most today, I can still sense the holiday mood hanging around in the air. No worries, there's still 10 more days of CNY to go, and the next one to look out for would be "人日" on the 9th of the first month. There will be more gatherings and definitely more feasting going around!

Since I have so much to catch up on my blogging, I decided to just post up this Hazelnut Banana cake post since I know some of us will have ripe bananas hanging around in the house after all that praying a few days ago. :D

This recipe is actually an adaptation of the one DG from Tasted and Tested posted up a month back. In her post, the recipe source came from Small Cakes by Roger Pizey. I have actually made this recipe twice already and both turned out great!

I modified the recipe slightly and increased the amount. And I used Hazelnut instead of Almonds here. Here is the recipe for easy reference:

Recipe for Hazelnut Chocolate Chunk Banana Cake:
3 to 4 medium size ripen bananas, peeled and mashed
225g unsalted butter (room temperature)
280g caster sugar
75g toasted, de-skined and ground hazelnut
3 large eggs
265g plain flour
1 tsp salt
1/2 tsp baking soda
1&1/2 tsp baking powder
200g sour cream
2 tsp pure vanilla extract
100g chopped semisweet chocolate (I used 65% Lindt)

Method:

  • Preheat the oven to 180C. Grease a 10 cups bundt pan or two 8X4.5 loaf pans.and lined
  • In a large mixing bowl, cream the butter, salt and caster sugar together till light and fluffy.
  • Add in the ground hazelnut and mix well. Then add the eggs one at a time, mixing well after each addition.
  • Add sour cream into the mixture and stir well.
  • Sift in the flour, baking powder and baking soda into the batter and stir well but not over mix.
  • Lastly add in the mashed banana, chocolate chunks and pure vanilla extract and stir till just combined.
  • Pour batter into prepared cake pan and bake for 40 to 50 minutes till tester comes our clean.
The outcome was a tender moist, fragrant and delicious banana cake. :P The hazelnut added in this cake makes it all so special, a whole new level from your usual banana bread. ;) And since I added chocolate chunks in as well, eating it feel like munching on a banana Rocher cake, hahaha!

I had actually made this cake twice and both turned out great, very well received my my family. :) So next time when I want to bake banana bread, I would definitely bake this cake....that is if I have ground hazelnut at hand. Alternatively, do it like DG, replace with ground almond, I think it'll be nice too. :)

Okie dokie, not gonna keep you folks here too long. Hope you all have another great week of CNY celebration! Have fun all! Cheers!