Thursday, June 30, 2011

Sweet Bread Loaf (5°C 冰种法)

Oh wow, I'm amazed at my own diligence, heehee. :D Three posts in a week! Where do I find the time? I guess just squeeze it out here and there and voilà! This recipe was made 1 months back and I nearly forgotten about it, well until I was looking through my photo folders. So why not post it up now?! I got this recipe from a new bread cook book I bought at Taiwan airport awhile back, call "面包教室 : 5°C 冰种的美味". Actually got recommended by my good friend Reese. Since it is a new technique, I chose one of the easier recipes in the book. a simple sweet bread loaf.

Ingredients for Sweet Bread loaf (5°C 冰种法): (makes two 9"X5"X5")
Starter Dough:
250g bread flour
162ml water
1g instant active yeast

Knead everything together till form a soft dough. Let dough proof in room temperature for an hour. Punch out the air and place in a large Ziploc bag and chill in the fridge (supposing 5°C) for 20~24hrs.

Main Dough:
350g bread flour
100g caster sugar
5g salt
8g instant active yeast (original calls for 15g fresh yeast)
1 whole large egg beaten
300g of starter dough
75ml fresh milk
50g unsalted butter

Filling:
Chocolate chips
Cranberries

Method:
  1. Knead everything together except the butter till it is not sticky. Add in the butter and continue to knead till it passes the window panel stage. Whole process takes about 20 minutes.
  2. Let dough proof, covered for 45 minutes. Then punch out the air and divide the dough into 6 equal portions. Or if you prefer to bake the dough in a different pan rather then a pullman tin, weigh and divide as desired. Roll round the dough and let rest for 10 minutes before shaping.
  3. Meantime, preheat the oven to 180°C. Grease the required baking pans.
  4. If you want to use fillings like chocolate chips or cranberries, add them in during the shaping step. After shaping your dough, place them in the greased pan and let proof for another 30 minutes till it fills 80% of the pan.
  5. Bake in the oven for 30 minutes or till the top is golden brown. If the top brown too soon, cover it with aluminum foil and continue to bake till the time is complete.
  6. Once removed from the oven, remove from the pans and let cool on rack completely before slicing.
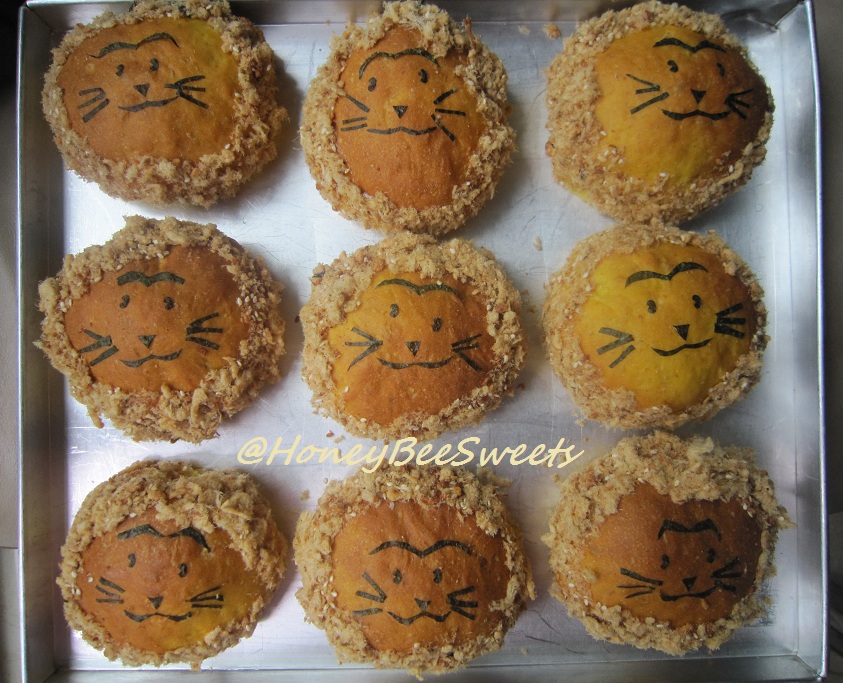
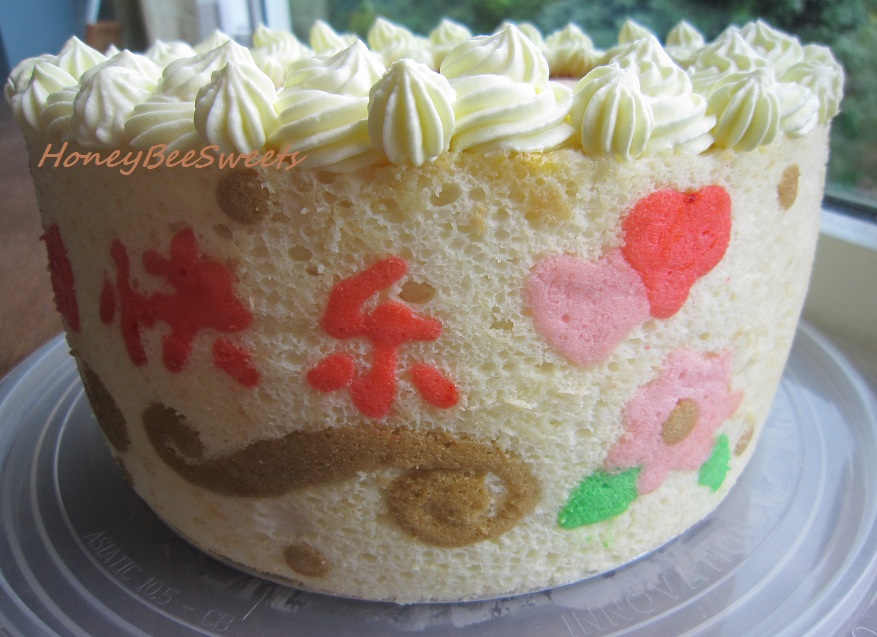
As you can see I used the dough portion to make it into 2 different shapes. The round loaf is with chocolate chips which is my kids' fave and the big loaf is with cranberries. :) The bread did turn out nice and soft and was well liked by my family. :)
This book actually has 2 starter dough method; one is like Tangzhong (汤种法) method while the other is like the refrigerated pre-fermented dough method. So far this recipe gave a pretty good result, but I will have to explore more recipes inside the book to better advice everyone. Hopefully will post up more recipes from the book in the near future.
Hope this photo of the fluffy soft center is enough to tempt you folks to try it out, hehehe. :D

I hope I can make it in time for Aspiring Bakers #8 - Bread Seduction (June 2011) hosted by Jasmine from Sweetylicious. Thanks again Jasmine! Yes....it's my last submission for sure. ;)

Cheers all!

Monday, June 27, 2011

Belated Father's Day Cake; Passion Fruit Cream Cheese Cake

When you have a big family, you will know what I mean when I say it's really hard to gather everyone together just to have a meal together. Especially when everyone is so busy with their own schedule, travel plans and family matters. But nevertheless, my siblings and I try to make an effort to gather, even if its a belated one. And so happen that this year's Father's Day celebration, we had a belated celebration. But I'm glad, since last weekend I was busy making my daughter's birthday cake! *Sorry Dad* :P And so I made a simple yet delicious cake for my dad, a Passion Fruit Sponge Cake with Passion fruit cream, swiss roll style... again!. :D
Ohh I love passion fruit! The fragrance is superb! :) I think I shouldn't have procrastinated so long to use it again in my cakes. In fact I baked with it only twice before, a chiffon and a pound cake. This time round, a sponge cake recipe,百香果乳格蛋糕卷 (passion fruit cream cheese swiss roll) from 孟老师的美味蛋糕卷 cookbook, but I did several modifications to it so as to fit a bigger baking tray.

Ingredients for Passion fruit Cake Batter (13" by 15"):
Set A:
50g unsalted butter
50ml fresh passion fruit juice (~ 3 passion fruits)

Set B:
266g whole egg
20g egg yolk
110g caster sugar

Set C:
112g cake flour
2 tsp cornflour

Ingredients for Passion Fruit Cream Cheese Filling:
120g unsalted butter
120g cream cheese, room temperature
42g confectioner's sugar
40ml passion fruit pulp
100ml non dairy whipping cream

Method: (全蛋式海棉蛋糕)
  • In a heat proof bowl, microwave the butter and passion fruit juice together till butter melts. Stir mixture and let it cool completely before using it.
  • Line baking tray with parchment paper and greased it again. Preheat oven to 170C.
  • Using electric mixer, beat the whole eggs, egg yolk and sugar together till it triple in volume and ribbon stage.
  • Take about 1/5 of the egg batter and mix well into the melted butter and passion fruit mixture. Then add this mixture to the rest of the egg batter and stir gently till the batter is uniformly combined.
  • Sift the cake and add about 1/3 of it to the egg batter. Using the lowest speed, beat the batter till no flour is visible. Repeat with the rest of the 2/3 flour, in 2 portions and mix well till everything incorporated.
  • Pour the cake batter into the prepared baking tray and bake for 13 to 15 minutes till golden on the surface and the cake bounces back when pressed. Let cake cool completely before use.
  • In the meantime, prepare the cream cheese filling: Cream the butter, cream cheese, sifted powder sugar and passion fruit juice together till smooth.
  • Pour in the whipping cream and continue to whip at high speed till mixture fluff up and increase in volume more. Chill the mixture if not using immediately. Else use cream on cake and decorate at will. Have fun!
Okay, I should clarify why I said "swiss roll style...again" earlier. I have used the same method to "set up" this cake which I used in my husband's birthday cake a couple years back. Check out the link and you will see what I mean. :)) That is why my cake is close to 5" tall, heehee.

My family loved this cake and keep raving about it even the day after when I talked to my sister, heehee! They said it's really something that can't be bought anywhere else in Singapore and best of all it is delicious. *touched* :))
Sorry for my poor photo shots, this picture can't really show the vertical layers of of sponge cake and cream in it. :P As for the tast? Trust me, it's good...not too sweet, very fragrant, soft and you can't stop until you have a big slice! Try it out will you?

Had the initial intention to do a double recipe post today but decided not to, since it's getting late. :P Will post again soon. Hope you all have a good week ahead! Cheers!

Friday, June 24, 2011

Dark Chocolate Buns with Chocolate & Peanut Butter Chips

It almost seems like chocolate flavored bread is the most commonly baked around my house. My kids simply prefers that flavor and perhaps an occasional white or wheat. And usually when I bake chocolate bread, it is good enough to be eaten on it's own, so pretty much save me the trouble for spreads or condiments. This time I wanted to use up the peanut butter chips that has been sitting in my fridge for awhile. So I used both chocolate and peanut butter chips, to have double the "yumminess" !

Sorry if this bread looks like some lumpy chocolate cake. -_-" Somehow the idea of baking the buns in my 8" by 3" round cake pan seems appealing. :) I didn't want to bake it in a loaf tin again like the previous time, and so this. Although this time round I have adapted the Tangzhong method instead of the 17hr pre-fermented dough technique.

If you ask me which recipe is better, I have to say the 17hr pre-fermented dough technique for sure. Somehow this Tangzhong chocolate bread didn't turn out as soft as I expect it to be and it didn't stay soft after the end of the 2nd day. :P Nevertheless, it was still very good the first day and my family enjoyed it very much. So if you want to try out a small batch, here is my recipe, feel free to halve it.

Recipe for Dark Chocolate Buns with Chocolate and Peanut butter chips:

Tangzhong dough:
30g bread flour
150ml water

Whisk the bread flour and the water together in a heat proof saucepan. Heat the mixture at low heat till it thickens and ribbons stage.

Main Dough:
350g bread flour
20g unsweetened cocoa powder (I used Valrohna)
74g beaten whole egg
All of the above Tangzhong mixture
60g caster sugar
6g salt
6g instant active yeast
50ml fresh milk
50g chocolate, chopped small and melted
40g unsalted butter, room temperature

60g semisweet chocolate chips
60g peanut butter chips

Method:
  1. Knead everything together except for the butter. Knead till the dough is no sticky. Add in the butter and continue to knead till it passes the window test. Takes about 15 to 20 minutes on stand mixer.
  2. Let the dough proof covered for 1.5hrs or till double in volume. Punch out the air and let divide into 10 or 12 equal portions. Roll round and let rest for 10 minutes before shaping.
  3. Grease the baking tin / pan and preheat the oven to 175C.
  4. Take a dough portion and roll flat into a flat disc. Sprinkle some chocolate chips and peanut butter chips on it and roll it up like a swiss roll. Seal the edges nicely and then again roll the log up into a coil / swiss roll. Place it in the prepared pan and repeat the shaping steps with the rest of the dough portions.
  5. Let the dough proof till it fills about 90% of the pan. You can choose to brush the bun tops with egg wash but I opt not to this time. Then bake in the oven for 30 to 40 minutes.
  6. Once baked, remove from oven and remove from the pan and let cool completely before serving.
The chocolate and peanut butter chips makes this chocolate bun much tastier then it already is. I guess I need to improve on this recipe to make it stay soft even on the next day after. But if you are making a small batch, it is still worth baking this delicious bread minus the long 17hr waiting time. :)

Submitting this post to this month's Aspiring Bakers #8 - Bread Seduction (June 2011) hosted by Jasmine from Sweetylicious. Thanks Jasmine! :)

Have a nice weekend all!

Monday, June 20, 2011

Ballerina Fondant Birthday Cake

It almost seems like a couple months back when I just celebrated my elder child's birthday. But it always appear too soon when the birthday arrives again and another celebration awaits. And since making a fondant cake for my child seems inevitable, I wanted it to be nice and something she will remember for a long time. Her initial suggestion was a Cinderella cake...and I was thinking like "Oh....princess cake again?" Unwilling to settle with that, I browsed through the net and was delighted when a brilliant idea pop in my mind....why not ballerina?! My elder daughter has been a ballerina since she was five and has enjoyed it very much. And since she did very well in her recent RAD Grade 2 exam, I thought it'll be perfect to bake her a ballerina cake this year. :)
It ain't easy to make a fondant cake, be it big or small. The steps involved not only include studying the feasible cake recipes used, it also include the 'architectural" design of the fondant used on the cake. Especially if its a 2 tier and there's figurine involved. It's not my first attempt to make a 2 tier fondant cake, but I can't call myself good in it in anyway when it comes to making something so challenging. For this cake, I took a total of 3-days preparation, with design, moulding, baking and assembling. I broke up the steps so I can still handle my daily chores as per normal.

Sounds like some labor of love, but in fact it is, lol! I don't do fondant cakes that often but I enjoyed the whole process every single time I did it. I do wish I have the leisure to make it as often as I like. :) Anyway, back to the cake, I have adapted the same sponge cake recipe I used in my previous fondant cake. But this time I got a little adventurous and came up a new Strawberry sponge cake recipe. If you trust me enough, you'll know when I say, " Its a keeper!" In fact I made a 8" by 3" round strawberry sponge and a 6" by 3" round chocolate sponge to stack up the 2 tier. And yes, the cake is pretty tall...close to a 12" tall. :D

Recipe for Strawberry Sponge Cake (8" by 3" round)
Set A
270g whole egg
50g egg yolk
155g caster sugar
24g Glucose or Light Corn Syrup
1/4 tsp salt

Set B
130g fresh / frozen strawberries, cut small
36g vegetable oil
24ml fresh milk
20g Nesquik Strawberry Powder (Can be found in Cold Storage or Market Place)

Set C
148g Cake flour

Method:
  • Beat sugar, whole egg and egg yolk till foamy using the mixer in a large bowl. Then add in the glucose / light corn syrup and salt and continue to beat the mixture till triple in volume and ribbon stage. That will be about 10 minutes. Note that the initial 6 to 7 minutes should be at high speed and then reduce the speed to low for 2 - 3 minutes. This step will prevent having large bubble and thus causing the cake to be coarse and not so tasty. And beating the eggs enough to reach stabilize ribbon stage is important as well in order for the cake to rise and have fluffy texture.
  • Preheat the oven to 175C.
  • In the blender, add strawberry chunks, oil, milk and strawberry powder and blend till well combined and smooth.
  • Take about 1/5 of the egg batter and mix well into the strawberry puree batter. Then add this mixture to the rest of the egg batter and stir gently till the batter is uniformly combined.
  • Sift the cake and add about 1/3 of it to the egg batter. Using the lowest speed, beat the batter till no flour is visible. Repeat with the rest of the 2/3 flour, in 2 portions and mix well till everything incorporated.
  • Pour the batter into a 8" by 3" round removal base round cake pan (un-greased and no parchment needed) and bake in the oven for 35 to 40 minutes till all golden brown and tester comes out clean.
  • Once removed from the oven, invert it on a cooling tray. Once completely cooled,then remove from pan.
The sponge cake turned out moist (yes moist!), soft, spongy and delicious. I was quite please with the outcome this time. This recipe is a keeper for sure, will try it out with passion fruit or lemon flavor next time...yum! For the Chocolate flavor, please kindly refer to Kitchen Corner's blog post.

Here is a shot of the cut up chocolate sponge cake. I have made 3 layers with non dairy whipped cream and fresh bananas.
Obviously my version can only be for short lived occasion as the sponge and cream cannot hold up as long as butter cake and butter cream version. But I am satisfied with it as I like a lighter cake to enjoy after dinner rather then having to down a slice of rich and thick butter cake with overly sweet butter cream icing. ;P
But to have a sponge cake as the foundation, its really not easy to hold it up nicely, so it all came with a price; the base tier kind of got squished a little because of the weight from the topper and top tier. See the "gathers" at the side? Good thing its not too obvious and it still held up all the way till the time the birthday song was sang and candles blown. :)

Some how I was super relived when the birthday celebration is all over...like a huge stone been lifted from my shoulders. My daughter loved the cake very much and it all ended well. :) It will be another 4 months before I have to come up with another one of these fondant cake.....so until then, it's simple breads and cakes folks! Anyway, hope you all had fun viewing my creation and will inspire you to play with fondant next time. ;)

Have a good week all!

Friday, June 17, 2011

Pumpkin Bread Loaf with raisins (17hr pre fermention method)

As I mentioned in my previous post, I wanted to post up another 17hr pre-fermentation method bread recipe. It is now without a doubt that this method is my all time trusted and favorite way to bake breads....well until I find another better method of course, heehee. So in the meantime, I probably be using this technique for most of my bread baking. Today's recipe is Pumpkin square loaf with raisins. ;) Square? Well, if you have been following my blog, you would have notice that I have never, yes never, covered my pullman loaf pan to bake a square loaf. Because the thought of restricting the dough from rising higher just doesn't seem right to me, lol! Anyway, this time I decided to give it a try....


I love using pumpkin in my breads, it gives it that extra golden glow! If you are not big on pumpkin, no worries! This recipe doesn't have an evident pumpkin taste. :) Besides, it seems like a healthy choice to add this nutritious root vegetable into the first meal of the day. So here it is folks, the recipe:

Ingredients for Pumpkin bread loaf with raisins: (makes two 9"X4"X4" loaves)
Pre-ferment Dough:
411g bread flour
235ml water
12g instant active yeast
6g sea salt
12g skim milk powder

Main dough:
176g bread flour
18g skim milk powder
6g sea salt
59g caster sugar
18g whole beaten egg
6g instant active yeast
41ml water
135g cooked pumpkin puree
40g unsalted butter
150g raisins

Method:
  1. Knead all ingredients of the main dough together, except the butter. Add pre-ferment dough piece by piece. Knead after each addition until soft and smooth. Add butter. Knead until stretchable and pass the window panel consistency.
  2. Put the dough into a big bowl. Cover with cling wrap and let it prove for 30minutes till double.
  3. Divide the dough into 6 equal portions. Flatten each portion with your hands to drive the air out. Roll it into square shape, cover and let rest for 20 minutes before shaping.
  4. Flatten the dough to drive the air out. Roll each out into a rectangular sheet with a rolling pin. Fold about 2cm from both sides towards the center and roll it out again. Roll the dough up like swiss roll (the width should be the same as the tin) and out them into the mould. Repeat for the rest of the dough portions. Cover with cling wrap.
  5. Let it prove for about 45 minutes or until the dough has risen to 80 to 90% of the depth of the loaf tin. You can either cover the lid or bake it open top. If open top, brush with egg wash. Bake in 175C for 30 to 35minutes.
Feel free to half the recipe to bake just one loaf. But I usually make the full pre ferment dough but use 1/2 of it to bake one loaf and saving the other half for my next loaf a couple days later. That way it saves one waiting time for the pre ferment dough. ;)
The loaf is soft and delicious and like I said before, this technique yields bread that stays soft even the next day or more! ;) My kids loved it, they devour a thick slice down with just a thin spread of butter. ;) Fluffy soft bread + creamy cold butter + sweet plum raisins...whats not to love?
A close up on a torn out piece. Hope you are convinced enough to try this out. :)

Again submitting this to Aspiring Bakers #8 - Bread Seduction (June 2011) hosted by Jasmine from Sweetylicious. Thanks Jasmine! :)

Cheers All!

Tuesday, June 14, 2011

Lion King Bread; Wholemeal Pumpkin Buns with Seaweed Pork Floss

It's been more then a week since I last updated my blog. I guess it's no surprise that holiday time for the kids is double the work load for the mums. :P Now besides having to take care of the daily chores, I have to keep my kids busy and entertained as well. Not that I'm complaining since I get to spend more time with them but sometimes it can be pretty "challenging" to think of quality stuff for the kids to spend their time. Anyway, today I have this small pocket of time for myself to post up something fun for you all to see. "Lion Face Bread" made from soft wholewheat pumpkin buns with seaweed pork floss. :))

You may be wondering why make Lion face, why not any other animals? Cuter ones maybe? Well, I made these Lion face buns mainly because I got the inspiration from the Musical Event that is going on now in MBS Singapore; The Lion King. Don't get me wrong, this is not a paid advertisement, lol! I guess its mainly because of all the excitement that my family and I are going to watch this Musical at the end of the month! It's been dog years since I last watched a Musical show! But if you ask me which...I've seen it all! Les Misérables, Phantom of the Opera and Cats, you name it! I remember the last one I watched was Beauty and The Beast Musical that was showed in San Francisco downtown...can't remember how long ago was that! Lol! So you can say I am a Musical fan. :))


Enough with the Musical, back to our delicious buns! I have to say although these buns are quite time consuming to make, it was still a whole load of fun! Not to mention, the most tedious part of making these was the cutting out the face features of the lion using seaweed. :P My kids had fun helping me sticking the seaweed on....well, another fun kids project!

The recipe was adapted from Carol's "The Second Book of Baking for Beginners" . But because the amount & kind of pumpkin(some has more water content) I used was different from the recipe, I made several adjustment to it. Here is my version:

Ingredients for Lion Face Bread : Wholemeal Pumpkin Buns with Seaweed Pork Floss (makes about 9):
150g pumpkin puree (I used 188g)
240g bread flour (I used 375g, much more because mine was high in water content)
30g wholewheat flour (I used 40g Prima Wholemeal flour)
30g caster sugar (I used 38g)
1/2 tsp instant active yeast
1 large egg ~50g (I used 64g of beaten whole egg)
1/8 tsp salt (I used 1/4 tsp)
90ml fresh milk (I used 114ml)
30g unsalted butter (I used 38g)
Filling and topping
A large seaweed sheet
4 to 5 tbsp mayonnaise
~2 cups worth of floss of your choice

Method:
  1. Place the peeled, steamed and mashed pumpkin puree into the mixing bowl. Add in all the ingredients for the bread dough except for butter.
  2. Knead everything together until it is not sticky and elastic. Add in the butter and continue to knead till it pasess the window panel test. About 20 minutes on the stand mixer to reach that, you can let the machine rest 5 minutes between the kneading in case it over heats.
  3. Cover the dough to proof for a good 1.5hrs till it doubled in size.
  4. Once proofed, punch out the air and divide the dough into 9 equal portions or more if you make smaller ones.
  5. Roll round the portions and let rest for 10 minutes covered before shaping. In the meantime, get ready the seaweed and floss filling. Preheat oven to 180C.
  6. Roll out each dough portions into a flat disc and place about 1 heaping tbsp of floss filling in the center. Seal up nicely and roll round. Repeat till all the dough portions has been filled and shaped.
  7. Brush the bun surface with a little bit of water, not too much, just enough to moist it. Cut out the face features of the animal / lion, then stick it on the bun top. Repeat till all the bun top has been nicely decorated.
  8. Bake the buns in the preheated oven for ~13 to 15 minutes till it is golden brown.
  9. Let the buns cool before proceeding to do the next step of decoration.
  10. After 10 minutes, squeeze some mayo around the edges of the bun. Then spread it out evenly, making sure you don't smear on to the animal face. Then roll the buns on a plate of floss to coat it well to create the mane around the Lion's head. Repeat till all is coated.
Besides being so fun to make, it turned out pretty yummy too. ;)) My kids loved it very much...soft bread with mayo and floss, you can't go wrong with that! And little did they know I added wholemeal flour and pumpkin in to it, making it just a bit more wholesome.  Even my picky eater ate one big bun all on her own this morning, at record speed! Lol!
Not convinced? Check out the photo to see the fluffy texture. :) Love the air pockets in the bun which makes it light and easy to eat.

Besides, this is definitely a fun project you can do with your kids at home, make any kind of animals you fancy. I guarantee you and your children will have a fun filled day baking and eating it. :))

I am submitting this post to this month's Aspiring Bakers #8 - Bread Seduction (June 2011) hosted by Jasmine from Sweetylicious.

Cheers all!

Friday, June 3, 2011

"Swiss Rolled" Mango Yogurt Cheesecake

Last weekend was my MIL's birthday and for the past month, I had been pondering what kind of cake should I be baking for her. Nothing too "adventurous" either in taste or looks, especially if it's meant for an elder member of the family. But I wanted to bake something real special too, not something I've done before. :P So with much consideration and "engineering" involved, I decided to go with this Swiss Rolled Mango Yoghurt Cheesecake. Why Swiss rolled? Check it out yourself:
 
If you remember a while back when I did the Pikachu Mango Swiss Roll Cake, you'll know where I got this idea from. Nice? I sure hope it had made the birthday lady a littler happier seeing this cake. If there is a phrase to describe what I went through to make this cake, it's "没有功劳,也有苦劳" (rough translation: even if I didn't get any credit for it, I sure did gave my full effort in making it). You folks must be wondering what effort? What's the big deal? Well, the thing was I made a major mistake in the process of baking the Swiss roll cake around it. When I piped the Chinese characters "生日快乐", I didn't realize that it will turn out to be the mirror image when I placed the sheet cake up! Left with no choice, I re-baked the Swiss roll sheet again, deco and all....*sigh!!!* Well at least there's a lesson learnt here! I'm pretty sure I won't be making this mistake again....I hope!


I got idea of making fruit yogurt cheesecake from Wendy of Table for 2 or more, where she made a Passion fruit Yoghurt Cheesecake. It looked really light and refreshing, something nice to have after dinner. So it was definitely a good choice for me. :)) I followed her recipe to the dot except that I replaced the passion fruit with fresh mango puree and the plain yogurt with mango yoghurt. As for the Swiss roll, you can use my Pikachu mango Swiss Roll cake recipe. :))
Besides the minor "set back", I really enjoyed making this cake. :) It still turned out as I expected it to be. (BIG relief!). :P It was light and freshing, with a slight tang from the yogurt which I find it easy to go down even after a heavy dinner. :))

As you can see from the sliced up cake, the yogurt layer and the cheesecake layer are not in proportion. :P I should have doubled up the cheesecake recipe and reduced the the yogurt filling. O well, next time! BTW, sorry for my poor photography this time, sure didn't do justice to the cake, heehee *thick skinned!*

Hope you all like this cake I made and a little inspired to bake a nice birthday cake yourself for you loved ones. :) Either way, have a good good weekend! Cheers all!