Monday, December 31, 2012

Fried Purple Sweet Potato Balls (炸紫薯QQ球) and Happy 2013!

Hi my dear readers and fellow bloggers! It's already the last day of 2012! Hope everyone is all ready for the arrival of the new year. Well, to me, last day of 2012 is just another ordinary day really. No no late night parties nor clicking champagne glasses today. Actually I can't ask for more but to spend the day quietly with my kids before the hectic school life starts again. ~Bliss~ I had promise them a game of monopoly later after my post and they are actually "eyeing" on me right now as I type, lol! I guess I will have to keep this a short one. :) So today I will be posting a very simple dish call Fried Purple Sweet Potato Balls (炸紫薯QQ球), in support to this month's MFF, featuring Pahang. ;)
I know the usual fried sweet potato balls are in a nice golden colour...but mine are just ehh....purplish-brown?! Okay, it probably seem like a bad idea to use purple sweet potatoes here...but I reckon why not break from the norm? It won't hurt to be a little more adventurous no?
Since there was quite a number of recipes out there for this simple desert, I had to decide what kind of texture and mouth feel do I really want to achieve here. When I saw Gert's recipe, I knew her's was THE one I would want to try. Gert's version has included glutinous rice flour which result in a mochi like texture which I think will be pretty delicious and unique! However I did made some slight changes to it as I didn't want it to be too chewy, I reduced the glutinous rice flour. Plus I omitted the shredded coconut since I didn't have any and I prefer without it too. Here is my version:

Ingredients for Fried Purple Sweet Potato Balls (yields about 50-60 balls)
450g peeled and steamed purple sweet potatoes
150g glutinous rice flour
100g cake flour
30g corn flour
100g caster sugar (Original calls for 120g)
Vegetable oil for frying
caster sugar for coating (optional) 
  • In a large mixing bowl, mash the still warm sweet potatoes together with the sugar. Add in the rice flour, cake flour and corn flour and mix well. Knead everything together until it comes together to form a soft pilable dough. 
  • If the dough is too wet, add a little bit more rice flour, if it is too dry, add a tablespoon of warm water. It shouldn't be sticky.
  • Weigh the dough into 15g each and roll round with your palms, continue till all has been rolled.
  • Heat up some vegetable oil for frying at medium low fire. Deep fry the balls till golden brown or purplish brown in my case, haha
  • Remove from hot oil and let sip over paper towels. 
  • Since my sweet potato balls were not sweet enough, I ended up rolling them in fine caster sugar after frying them. You can skip this can just add more sugar into the dough.
As you can see I rolled most of them in fine caster sugar. Well, I thought it will be sweet enough but too bad it turned out not so. But feel free to omit this if you don't have a sweet tooth like me, heehee. :D 
The texture of these balls was just as expected! Crunchy good on the outside and soft chewy interior was really yummy! I made this for a family BBQ gathering and it was very well received. ;) This is truly an "old-school snack" as my MIL love it the most, haha!

I am happy to submit this to this month's Malaysia Food Festival featuring Pahang with this post, hosted by Wendy from Table For Two...or more. Thanks again for hosting this month! :)

Before I sign off, I want to wish everyone out there a very HAPPY 2013 ahead! Although the new year may be full of new challenges, but I believe that as long as one puts their heart to it, each hurdle will just be another experience that will build a stronger you. So stay strong and healthy my friends! Peace!


Thursday, December 27, 2012

Red Velvet Christmas Yule log Cake

It's so fast! Christmas is finally over...gosh I am already feeling to the "blues" coming on. :P I guess that has A LOT to do with the school reopening soon. ~Dread!!~ 6 weeks seems to fly pass so fast...it almost seems like it was only yesterday that we just started our holidays, no? Lol! Anyways, we all have to face the inevitable ...come what may, we deal with it one day at a time with an open heart! ;) 

Although Christmas has already past, but I reckon that I best post up this fabulous red velvet Swiss roll log cake recipe for future reference. I hope everyone had a fabulous Christmas celebration...and got their desired Christmas present! I know I did! Will elaborate on that on my coming pot. ;) For now...the Red Velvet Yule Log Cake.
It almost always that I made 2 yule log cakes for Christmas every year. And I always prefer to try a new recipe. And since I love red velvet cake with cream cheese frosting, I thought it will be really nice to bake it into a log cake! Plus that red coloring just adds on the festive mood!  And of course I referred to none other then Martha Stewart's recipe since her red velvet is the best I've tasted. :)
This recipe is the "bomb", I can eat it everyday, haha! I actually made these cuppies for my kid's form teacher awhile back and she loved it too. ;) And remember I actually used it in my mum's birthday cake: Red Velvet & Light Cheese Cake with Pink Ombré Roses.

However for this log cake, I need to change the recipe so that the cake can be soft and "flexible" enough to roll up nicely. So here is the version I have come up with, without compromising the wonderful velvety taste of the cake:

Ingredients for Red velvet Swiss roll cake: (makes a 13" by 14" tray) (serves 10 -12 ppl)
3tbsp quality cocoa powder (I used Valrohna)
20ml hot water
- Mix cocoa powder and hot water together to form a thick paste. Let cool for use later.
80g egg yolk
40g caster sugar
100ml buttermilk
50ml vegetable oil
130g cake flour, sifted
1 tsp vanilla extract
1/2 tsp red food coloring (I used Wilton no-taste red)
1/2 tsp white vinegar

120g egg white
80g caster sugar
  • Using the double boiler, place a mixing bowl over it. Add in the egg yolks and sugar. Beat the mixture till it thickens and double the volume. 
  • Remove from the boiler and stir in the cocoa mixture. Also add in buttermilk, vegetable oil, vanilla extract and stir gently till well combined.
  • Then add in the red food coloring and white vinegar and combine well.
  • Lastly add in the sifted cake flour and gently mix in till well combined.
  • Preheat the oven to 170C and lined and grease the baking tray with parchment paper.
  • In another clean mixing bowl, beat the egg white till foamy and gradually add in the caster sugar and beat till stiff peaks.
  • Gently fold in the whites to the egg yolk batter in 3 separate portions. Remember to fold in gently and not deflate the batter.
  • Pour the batter on the prepared tray and spread evenly. Bake in the oven for 15 minutes till done.
  • Remove from oven and let cool completely.
Cream Cheese frosting
340g cream cheese, soften 
227g unsalted butter, room temperature
200gg confectioner's sugar
1 tsp pure vanilla extract
  • Beat butter and cream cheese with a mixer on medium-high speed until fluffy, 2 to 3 minutes. Reduce speed to low. Add sugar, 1 cup at a time, and then vanilla; mix until smooth.
 Assemble:
  • Once the cake has cooled completely, spread about 1/3 of the cream cheese frosting on the surafce, evenly, leaving about 1" at the edge so as to have a cleaner edge when rolled up.
  • Roll the cake from the longer side inwards. Trim the sides and slice portions of the cake as desired to make different log segments.
  • Frost the cake till all is covered and use a fork to run through the frosting to create the log texture. Decorate at will! Chill as per needed so that the cream cheese frosting is more stable.

 I actually made the same recipe twice....and both occasion was a success! My friends raved about it and even her 5 year old daughter (picky eater) had seconds!
A look at the interior of the cake. :P Yummy! I definitely will be baking it over and over again. I was really glad the cake still turned out great after the modifications. :D

I am going to submit this to Aspiring Bakers #26 - Creative Christmas Motif Bakes! hosted by Alan of Travellingfoodies.

And also linking this post to Cook Like A Star organised by Zoe of Bake for Happy Kids, Baby Sumo from Eat your heart out and Riceball from Riceball Eats
Cook like a Star - December 2012
Martha Stewart


Monday, December 24, 2012

Christmas Tree Macarons & Merry Christmas!

For the past week, my daughter has been very excited about the arrival of Christmas Day. She had even written a letter to Santa, requesting for a nice Christmas present (a giant bubble blower...whatever that means) and said she has been a good girl for the longest time. Among all these excitement, she has not forgotten to play good hostess. She said it is a must that we prepare cookies and milk for Santa when he comes deliver the presents on Christmas night. If we did not prep any cookies, she claim that Santa will be very angry and will not give her the presents. Gosh! The books and programs she's been watching! Well I did played along with her of course, since it is fun for the kids to have a little hope and fantasy. Believe me, we even made my kids believe there is tooth fairy! Lol!

Anyway, I was gonna keep things simple by baking a batch of butter or oatmeal cookies. But when I asked my girl what is her most favorite cookie in the whole world...she said macarons. (I had to ask...);P I played with the idea and then finally decided to make it anyways. And to participate in the AB this month, I piped it into Christmas tree shape!
Tah-dah! Nice? Although the green can be slightly darker, but I am still quite happy with the end result. :) I was a little worried at first as it has been ages since I last baked macarons. ;P But luckily it didn't fail me. *~phew~* And you know who is more excited then me of course....my daughter said "Santa will be very happy".....(*_*")
I
I have used back the same trusty recipe, the Italian meringue method to bake this batch of macarons. :) I used chocolate Swiss Meringue Buttercream as the filling this time, since it's the all time favorite for my family. ;))

Ingredients for Earl Gray Macarons (makes about 25 cookies)
100g Almond meal (I ground mine from whole blanched almonds)
100g icing sugar
38g fresh egg whites (about 2 egg whites)
green food coloring / 1/4 tsp green tea powder
pinch of salt

100g caster sugar
24ml water

38g aged egg whites (about 2 egg whites)
  • In a blender, finely ground the almond powder and confectioner's sugar together till powdery like. Then pour it into a bowl and add in green food coloring or green tea powder. Then mix in the egg white and salt. Stir and mix well. Mixture will be thick.

  • In a saucepan placed over medium fire, heat up the sugar and water. Once the sugar has all melted, place your candy thermometer in and monitor it till it reaches ~108C. Once it reaches 108C, beat the egg white at high speed till it reaches soft peaks, which by then the temperature should be close to 118C.

  • Slowly drizzle the sugar syrup into the egg white while the mixer is still at medium speed. Once all the syrup is in, continue to beat till the meringue is glossy.

  • Fold in 1/3 of the meringue into the almond meal mixture. Since the almond mixture is thick, you'll need to stir harder to incorporate it well. Repeat the other 2 portions and fold in gently.

  • Scoop the batter into a piping bag with an 10mm nozzle. Pipe out on a baking tray lined with baking parchment paper into seven 20cents coin size circles which forms a Christmas tree. 

  •  

  •  Let rest the batter till it doesn't stick to your finger's touch. 

  • Preheat the oven to 150C with fan off.

  • Bake the cookies in the preheated oven for 14mins.

  • After baking, remove from oven and let cool completely before peeling off.


Chocolate Swiss Meringue Buttercream:

75g chopped dark chocolate

300g Swiss Meringue Buttercream


Melt the chocolate in the microwave and let cool for a minute before mixing into the room temperature buttercream. 
Assemble:
  • Melt about 40g of dark chocolate and dip the ends of the macaron cookie into it. Then let it cool to set.
  •   
  • Once the chocolate has set, fill macarons with the chocolate SMB and sandwich with one more cookie.
  • Decorate the cookie at will or just enjoy them as is. :)
I really enjoyed myself when I made these macarons, so fun! So perhaps you can try it out and get into the festive mood! Go, there's still time, hahaha!
One word....yummy good! 

I would like to take this opportunity to wish all my friends and readers out there a Merry and Blessed Christmas! 

I would like to submit this post to this month's Aspiring Bakers #26 - Creative Christmas Motif Bakes! hosted by Alan of Travellingfoodies.

Thanks for staying with me folks!


Monday, December 17, 2012

Chocolate Granola Wreath with Holly Buttercookies

It's the time of the year for giving again. Getting ready all those Christmas gifts does not necessary have to be such a long tedious chore. Sometimes, simple thoughtful gifts can also reflect your appreciation to your love ones. What better ways then baking up a batch of delicious homemade cookies? But besides the usual Christmas cookies or gingerbread man, what other fun delicious homemade goodies can you make? Well, I have a nice little idea to share with you all, much like the one I posted Chocolate Cornflake Wreath last year...but a healthier version, Chocolate Granola Wreath! :)
Okay, I know, but it sounds and look almost the same as last year, haha! But I guarantee you, this is equally delicious but much more wholesome! With the addition of rolled oats, it not only add on the wholesome goodness, it gives it that distinct texture (which I so love) and fragrant when you chew on it...delish!
In order to join in this month's Aspiring Bakers, I added the extra Christmas Holly butter cookies as part of the deco on the wreath. :) Why let a good post go to waste? Haha! Okay for the butter cookies, please kindly refer to the recipe here. Tint your cookie dough as desired and chill. Then merely use a paper template (self made) and cut out the cookies with a knife. 
You might just skip the step of making this granola and bake these holly butter cookies as a gift too! Not bad an idea too I think. ;) But anyways, who doesn't like a delicious granola to go with those buttery cookies? Lol! Here is my recipe for the granola:

Ingredients for Chocolate Granola Wreath (enough to make a 8"-10" ring)
120g bittersweet chocolate (I used 76% coco Lindt)
4 tbsp honey
1 tbsp unsalted butter
1 cup rice crispies ( I used Kellogg brand)
1 cup old fashioned rolled oats
1/4 cup dried cherries / cranberries / raisins
  • In a heat proof bowl, place chocolate, honey and butter in. Either melt these ingredients over the double boiler or simply just microwave it. Mix well till combined.
  • Lay some plastic wrap over the tube pan you will be using. (I used a 10" bundt pan)
  • Stir the chocolate rice crispies, oats and dried fruit(if using) in and make sure all are coated.
  • Spoon mixture into a tube pan (I used an 10" bundt pan). 
  • Wrap the mixture up gently with the plastic wrap and chill in the fridge in the tube pan for at least an hour or freeze if you are bringing it to a dinner party. 
  • Once the chocolate has set, remove from pan and remove plastic wrap. Decorate at will with colorful ribbons!   
A close look at the granola....loads of texture and goodness. It has a wonderful crunch from the rice crispies, slight tartness from the dried fruits and chewiness from the oats. Best of all, a rich chocolaty taste. Yummy! Remember to use quality chocolate to make this...every bite counts(calories)!
Hope you folks like this recipe and will give it a try. It's really good! You can even try with peanut butter or even white chocolate to have a different variation to this. ;

I am happy to submit this post to this month's Aspiring Bakers #26 - Creative Christmas Motif Bakes! hosted by Alan of Travellingfoodies.

Okay, hope you all have a good week ahead!

Friday, December 14, 2012

Matcha red bean buns; Christmas Tree

Time is flying pass so fast and it is only 10 days to Christmas. *Exciting* Although we are home bound this time during this Christmas, I am still glad because we get to enjoy more quiet family time. Besides that, we also put up our beautiful Christmas tree which has been "hibernating" for more then half a decade! (No worries, it's still in very good condition, haha!) This Christmas tree shared lots of wonderful memories with us, of our dear friends and family. So it's always sentimental to put it up. And now that the kids are more grown up, they were a great help in decorating the tree with the loads of ornaments that we have collected over the years from several countries as we traveled. (not to mention all those magnets on the fridge as well! ~faint~)

Talking about Christmas Tree, I got in the festive mood and baked a Christmas Tree too! A tree made from Matcha (green tea) soft buns, dried cranberries and sweet red bean paste filling. It was fun making it!
I got this great recipe from yet another cookbook I bought in Taiwan. Yes, I am gonna slowly post all them nice recipes all up, lol! This book is call "糕點女王的聰明烘焙法" which consist of simple delicious daily recipes that we love baking up when we have that small pocket of time. Again I did a little change to the recipe to my liking, here is my version:

Ingredients for Matcha Buns (enough to make a Christmas Tree)
200g Bread flour
20g wholewheat flour
6g Matcha powder
40g caster sugar
4g instant active dry yeast
1 egg white
3g salt
135ml water
30g unsalted butter @room temperture
1/4 tsp green food gel (optional : only if you want it real green)
1/2 cup dried cranberries
Red bean paste filling (or any filling you fancy)
  • In a mixing bowl, add in bread, wholewheat flour, matcha powder, sugar, salt, water, egg white and yeast. Mix well till it comes together to form a pilable dough.
  • Continue to knead till it is not sticky and pulls away from the mixing bowl. Add in butter (and green food coloring if using) and continue to knead till it reaches window stage.
  • Cover dough and let proof at room temperature for 2hours or till it doubled in size.
  • Punch out the air and divide the dough into 11 equal rounds. (or which ever portions you see fot to build your tree). Cover and let rest for 10 mins)
  • Flatten each dough portion and place about 15g of red bean paste in the center. Close and seal nicely. Roll round and lay it on a baking pan laid with parchment. Repeat for the rest of the portions till all is filled and rolled. Remember to assemble your tree as you go along.
  • Brush the dough surface with some egg white/water and press on some dried cranberries as decorations. Let proof for anothwe 30 minites covered.
  • Preheat the oven to 175C.
  • Bake the tree in the oven for 15minutes or till it is golden brown in colour. Remove from oven and let cool before serving.
As you can see, this is not complicated, I think anyone can bake this wonderful festive bread at home. Whether you choose green tea or pandan flavor, I am sure your little ones at home will enjoy, pulling off these soft delicious buns and munching it down happily. :)
Again another wonderful easy recipe, soft and yummy even on the following days! Do give this recipe a try. ;)

I am happy to submit this post to this month's Aspiring Bakers #26 - Creative Christmas Motif Bakes! hosted by Alan of Travellingfoodies. Thanks for hosting Alan! If you have not made anything for this month's AB, get in the kitchen now and join in the festive fun! 

Okay, hope you all have a wonderful weekend! Cheers!
 

Wednesday, December 12, 2012

Durian Egg Tarts

It's durian season again! Actually I think you see people selling durians all year round nowadays. But of course you get more varieties and cheaper value when it is REALLY in season. My hubby and I managed to lugged back 5 big durians for only $10...not bad of a deal, especially the meat was very aromatic and creamy! Now even my younger child started to love durians, she said it taste like yummy custard, and she is absolutely right. ;)

I took this opportunity to bake a batch of Durian Egg Tarts to join in this month's MFF, featuring Pahang. Found out from Wendy that it is a favorite treat there in Pahang, goodie! So here is my version:
Okay, I have to admit mine looks a little ugly...wrinkly and a wee bit browned surface. :P I guess my oven temperature should have set a little lower. But overall the taste was pretty satisfactory, better then I expected because it was my first attempt, haha! 

I have adapted to use my favorite pastry dough recipe from here. Okay, here is my recipe:

Ingredients for Durian Egg Tarts (makes 8 tarts)
Sweet pastry dough:
130g cake flour, 60g cold unsalted butter, cut small, 50g confectioner's sugar, 2 egg yolks, 1/8 tsp salt

Method:

  • In a large mixing bowl, add in the cake flour, powder sugar and salt. then using only your finger tips, work the cold butter into the flour mixture. Alternatively, use a mixer to combine the ingredients till it resembles bread crumbs.
  • Next add in the egg yolks and gently work the dough but not over kneading it. Over kneading the dough will make it hard and not flaky.
  • Chill the dough in plastic wrap for at least 30 mins till ready to be used.
  • Grease the mini tart tins. After chilled, take out the dough and divide the dough into 8 equal portions, about 33~34g each. 
  • Roll out each dough portion into a circular disc about the size of the tart tins. Then use your fingers to gently press in the pastry dough to shape it nicely to the tin shape. Repeat till all the pastry doughs has been shaped into the tins.
  • Put them in the fridge until needed. Proceed to make the durian filling.
 Durian custard filling:
1/2 tbsp condense milk
Pinch of salt

100ml fresh milk

100ml water
1 tbsp sugar
100g durian flesh1 egg
  • Preheat the oven to 170C. 
  • In a saucepan, add in durian flesh, water, sugar and salt. Turn on the fire to low and stir to cook mixture till the sugar has melted and durian flesh has disintegrated.
  • Strain the mixture leaving only the fibers and membranes of the durian flesh. 
  • Stir in the milk, condensed milk and egg, mix well. Again strain mixture.
  • Divide the custard filling equally among the chilled pastry tart shells.
  • Bake in the preheated oven for 18-20 minutes till the custard it slightly firm to the touch or not wobbly. 
The pastry crust is as expected, flaky, sweet and buttery. With the smooth custard durian filling, it was good. 
My mistake here was baking it way too high heat and perhaps the custard was a little too thick. No worries as the above recipe has already adjusted the amount of liquid. Will definitely try baking durian tarts again, but maybe with the addition of cheese next time as recommended by a good friend. ;)
 Hope this post has whet your appetite on baking some durian tarts for yourself. It is really quite simple to bake up now that I think about it. ;) Do try!

I am happy to participate in this month's Malaysia Food Festival featuring Pahang with this post, hosted by none other then our Wendy from Table For Two...or more. Have you submitted yours yet? If not, do join in the fun and learn more about the Malaysian food heritage by cooking in your very own kitchen! I know I did. ;D

Have a good day all! Will be back with a Christmas post next! Cheers!

Thursday, December 6, 2012

Banana Chocolate Chip Muffins with Salted Caramel Glaze

As always, when I have over ripe bananas at home, I will always try to look for new banana recipes to try out. Not that I have no favorite old recipes to fall back to, just that I believe like everyone else, it's nice to explore and discover new interesting ways of incorporating this versatile fruit into bakes. I happen to stumble upon this great recipe on Martha Stewart website which seems to fit the bill. It uses wholewheat flour and vegetable oil which seems pretty healthy, so I'm sold!

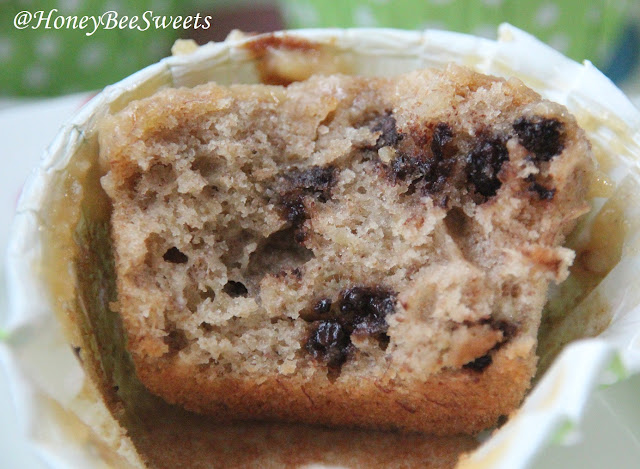
It was easy to fall in love with these muffins. Why? It taste soft and delicious, bursting with banana flavor and it won't bust your weighing scale even if you down a couple more. Hahaha! I also added a cup of mini chocolate chips into the batter (why not?!) which makes it even better. To kick up another notch (like Emeril Lagasse always say), I added salted caramel glaze over the muffins.....heaven! So who say a simple old banana can't be a wonderful sweet treat after all?
I made some changes to the original recipe, here is my version. Alternatively, click here for original version.

Ingredients for Banana Chocolate Chip Muffins With Salted Caramel Glaze
Salted Caramel Glaze: (Enough to glaze 18-20 muffins)
1/4 cup sugar
2 tsp water
2 tsp corn syrup/honey
3 tbsp heavy cream
1 tbsp butter
1/2 tsp sea salt
1/2 tsp vanilla extract
  • In a small saucepan over medium heat, combine sugar, water, corn syrup. Cook mixture until it begins to bubble.
  • Bring the mixture to a full boil and cook until it becomes dark amber in color and smells like caramel, about 6 minutes. Remove saucepan from heat and carefully whisk in heavy cream, butter and sea salt. Allow caramel to cool down for 15 minutes.
  • Lastly, stir in the vanilla extract and sea salt. Use immediately or cover and store at room temperature up to a day.
Banana Chocolate Chip Muffins: (makes 12 standard or 16 mini)
4 large ripe bananas
140g light brown sugar
110ml vegetable oil
1 large egg
140g cake flour
130g wholewheat flour
1 tsp baking powder
1/2 tsp baking soda
1/2 tsp salt
1/2 cup fresh whole milk + 1 tsp vinegar
1 tbsp pure vanilla extract 
1 cup mini semi-sweet chocolate chips
  • Preheat the oven to 175C. Line 12 muffin liners.
  • In a large mixing bowl, add in the 4 banana flesh and mix with the paddle attachment. Beat until mashed, about 1 minute. Add brown sugar, oil, and egg; beat until smooth. Reduce speed to low. Add flours, baking powder, baking soda, and salt; beat until smooth. Add milk vinegar mixture and vanilla; beat until combined. Lastly, stir in the chocolate chips till just combined.
  • Fill muffin liners three-quarters full. Slice remaining banana into 1/8-inch-thick rounds; place a slice on each muffin. Bake until tester inserted into center comes out clean, about 25 minutes for regular muffins and 20 for mini, rotating pan halfway through. Transfer to wire rack to cool. Store, covered, at room temperature.
  •  
  • Once the muffins are cooled, drizzle the caramel glaze over the top. You can use piping bags or squirt bottles to do that.
Since I did reduce the amount of sugar, the muffins were just right with the chocolate chips and the salted caramel. Each bite is rich banana aroma, chocolaty, sweet caramel with a hint of saltiness. I simply adore it! 


I'm linking this post to Cook Like A Star organised by Zoe of Bake for Happy Kids, Baby Sumo from Eat your heart out and Riceball from Riceball Eats
Cook like a Star - December 2012
Martha Stewart

Okay all, got to run again. Have a great weekend!

Wednesday, December 5, 2012

Chocolate Polo Buns (可可菠萝面包)

Oh my...has it already been a month? Gosh, I do apologies for my long silence. I guess I got a little carried away with my break and lost that momentum in blogging. :P With the family vacation, then the marathon and then a short illness. :P Well all is not lost! I'm back! Hopefully with more good stuff to share with everyone! And not forgetting it's December! Always an exciting month for us bakers, well at least for me...Christmas log cakes and alcohol-infused fruit cakes and Christmas cookies, yummy! Anyway, before I get carried away again, let's get back to today's post...my usual comforting bake, bread of course, haha! And it's Chocolate Polo Buns (可可菠萝面包) this time. ;)
This is my first time baking polo buns. I got this recipe from one of the book I bought in my holiday. "Handmade breads 手感烘烤;台式经典面包". This book is filled with new and fun ideas on shaping buns and exiting polo buns flavors. ;) Do look for this book if you are a bread baker fanatic like me. ;) By the way, if you are puzzled why these buns are called polo buns, here is what I understand. Polo buns are made popularized in Hong Kong. And the word "polo" means "菠萝" pineapple in Cantonese. And the "polo" refers to the buttery crunchy crust on top of the buns. Yums!
Ehh...if you are wondering why my polo buns are all crackly and separated...well it's my bad. I didn't read the instructions properly. I was suppose to let the buns proof first before topping the polo crust topping, instead I topped it and let it proof...*sigh* :P Well, the one you saw above is the nicest one, hahaha! No matter! It still taste good! :P

I made slight changes to the original recipe, mainly the amount of sugar used. Here is my version for reference:

Ingredients for Chocolate Polo Buns (makes 15-17 buns)
Main Dough
400g Bread flour
100g cake flour
100g caster sugar
5g salt
20g milk powder
5g instant active dry yeast
1 whole egg
100ml fresh whole milk
150ml water
50g unsalted butter, room temp
  • In a large mixing bowl, add in all the ingredients except the butter. Stir and mix till everything comes together to form a pliable dough.
  • Continue kneading till the  dough becomes elastic and pulls away from the side of the bowl and not sticky anymore.
  • Add in the butter and continue to knead till it reaches window stage. 
  • Place the dough into a greased bowl and cover to let proof for 1.5-2hrs till it doubled in size.
  • Divide the dough into 15 equal portions or 60g each portion. Cover and let rest for 20 minutes.
  • Preheat the oven to 175C.
Polo Topping
100g unsalted butter
90g powdered sugar
1 whole egg
10g milk powder
250-275g bread flour
10g cocoa powder
  • In a large mixing bowl, beat the butter and powder sugar together till light and creamy.
  • Add in the beaten whole egg slowly as the mixer is till going.
  • Add milk powder and 250g bread flour to the butter mixture and mix well. If the mixture seems a little too oily and soft, add in another 10 to 25g more of the bread flour till it is easier to handle. Lastly add in the 10g cocoa powder and knead it well till well combine. And not to over knead the mixture too which will also result in a hard polo crust.
  • Divide the polo mixture into 15 equal portions or 30g each.
  • Roll each portion till it is big enough to cover the whole top of the proofed buns.
  • Gently place the polo top over the bun and make checkers markings. Repeat till all the dough and polo portions are used up.
  • Brush the polo buns with egg wash and bake in the preheated oven for 10 minutes at 175C, then reduce the temperature to 160C and bake for another 6 minutes till golden brown.
  • Remove from oven when done and let cool completely before serving.
A look at the soft fluffy interior. ;) With the chocolaty buttery crust is a perfect match. ;)

Traditionally the polo buns are left plain with no filling which explains why the higher amount of sugar used in making the main dough. However in this recipe book, it does have recipes which uses different buttercream filling, meat floss and even cheesy red bean buttercream"鲜奶油起司红豆馅" (sounds weirdly inviting, haha!) Hopefully I will have the chance to show you all these great recipes. ;))

Okay all, got to go. Hopefully I will be back real soon! 
Cheers all!